


Types of Radiator Overflow Tanks
A radiator overflow tank is a crucial component of a vehicle's cooling system, designed to manage excess coolant as temperature fluctuates. There are two primary types available for automotive applications:
Traditional Radiator Overflow Tank
The traditional radiator overflow tank serves as a vessel for excess coolant that escapes from the radiator when it heats up. The overflow hose from the radiator allows the overflow of coolant into the tank when the pressure inside the radiator increases.
Key feature: When the engine cools, a vacuum forms inside the radiator, which causes some coolant inside the tank to be drawn back into the radiator.
Limitation: These tanks are not sealed and do not permit complete recovery of lost coolant.
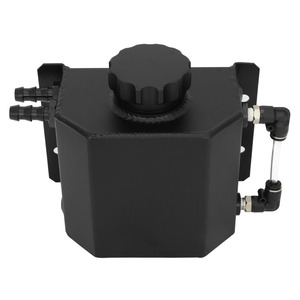
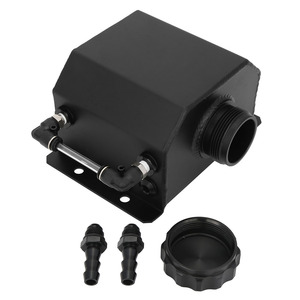
Recovery Tank (Expansion Tank)
The recovery tank is a sealed system connected to the radiator by two hoses. One hose draws coolant from the radiator, while the other returns it through a dip tube.
Key advantage: When the engine heats up, the coolant expands and flows into the recovery tank. When the engine cools down, the contracted coolant creates a vacuum, pulling the coolant from the recovery tank back into the radiator.
Benefit: This system ensures that the coolant level in the radiator remains constant, and virtually no coolant is lost during normal operation.
| Feature | Traditional Overflow Tank | Recovery Tank |
|---|---|---|
| System Type | Open system | Sealed system |
| Coolant Recovery | Partial | Complete |
| Connections | Single hose | Two hoses (overflow and return) |
| Pressure Management | Basic | Advanced |
| Found In | Older vehicles | Modern vehicles |
Expert Tip: Most modern vehicles employ recovery tanks rather than traditional overflow tanks due to their efficiency in coolant management and reduced environmental impact from coolant loss.
Specifications of Radiator Overflow Tanks
Understanding the technical specifications of radiator overflow tanks is essential for proper selection and maintenance of your vehicle's cooling system.
| Specification | Details | Importance |
|---|---|---|
| Capacity | 1.5 to 3.0 liters (varies by vehicle) | Must accommodate thermal expansion of coolant |
| Material | Polypropylene or polyethylene plastic | Corrosion resistance and temperature stability |
| Temperature Resistance | Melting point >200°C | Must withstand extreme engine temperatures |
| Pressure Rating | 1.0 to 1.5 megapascals | Safety factor to prevent bursting |
| Connection Size | 10 to 20 millimeters diameter | Must match existing hose specifications |
| Mounting Style | Brackets or direct bolting | Secure attachment prevents movement |
| Ventilation | Vent cap or pressure relief port | Releases pressure while containing coolant |
Typical Capacity Range by Vehicle Type
Safety Warning: Never remove the cap from a hot radiator overflow tank. Pressurized, hot coolant can cause severe burns. Always wait until the engine has completely cooled before service.
Maintenance of Radiator Overflow Tanks
Proper maintenance of the radiator overflow tank is essential for the longevity and efficiency of your vehicle's cooling system. Regular inspection and servicing can prevent costly repairs and ensure optimal engine performance.
Regular Maintenance Tasks
- Coolant Level Check - Verify coolant level is between minimum and maximum marks (monthly)
- Visual Inspection - Check for cracks, leaks, or damage to the tank, hoses, and connections (quarterly)
- Coolant Quality Test - Use a coolant tester to check pH and freeze/boil protection (bi-annually)
- Cap Inspection - Examine the rubber gasket for wear or damage (annually)
Periodic Service Requirements
- System Flush - Remove contaminants and deposits every 30,000-50,000 km or per manufacturer's schedule
- Coolant Replacement - Replace with fresh coolant according to vehicle specifications
- Cap Replacement - Install new cap if gasket shows signs of wear
- Hose Replacement - Replace hoses that show cracks, bulges, or softening (typically every 4 years)
| Maintenance Task | Frequency | Tools Required |
|---|---|---|
| Coolant Level Check | Monthly | None |
| Visual Inspection | Quarterly | Flashlight |
| Coolant Quality Test | Bi-annually | Coolant test strips or refractometer |
| System Flush | 30,000-50,000 km | Flush chemicals, drain pan, funnel |
| Hose Inspection | Annually | Flashlight, gloves |
Pro Tip: When checking coolant, never open the cap while the engine is hot. The cooling system is pressurized and can cause severe burns if opened while hot. Always wait until the engine has completely cooled down.
How to Choose the Right Radiator Overflow Tank
Selecting the appropriate radiator overflow tank for your vehicle requires consideration of several important factors to ensure compatibility, functionality, and longevity.
Essential Selection Criteria
- Capacity - Must match your vehicle's cooling system requirements
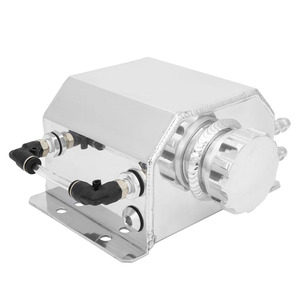
- Material - Plastic (lightweight, corrosion-resistant) vs. Metal (durable, vintage appeal)
- Compatibility - Specific to your vehicle make, model, and year
- Quality - Ability to withstand pressure and temperature extremes
Additional Considerations
- Design - Multiple ports vs. single outlet
- Installation Ease - Mounting mechanisms and included hardware
- Space Requirements - Size and shape fit under the hood
- Budget - Balance between cost and quality
Important: Selecting an undersized overflow tank can lead to coolant loss during thermal expansion, while an oversized tank may not properly fit in the engine compartment. Always verify compatibility with your specific vehicle model.
| Selection Factor | What to Look For | Impact on Performance |
|---|---|---|
| Material Quality | UV-resistant, high-temperature plastic or aluminum | Prevents premature cracking and leaks |
| Connection Types | Match to existing hose diameters | Ensures proper sealing and prevents leaks |
| Pressure Rating | Equal to or greater than OEM specifications | Prevents failure during pressure spikes |
| Brand Reputation | Established manufacturers with positive reviews | Generally higher quality control standards |
Shopping Tip: When replacing your radiator overflow tank, consider purchasing a complete kit that includes new hoses and clamps. This ensures all components are fresh and compatible, reducing the risk of leaks and failures.
DIY Radiator Overflow Tank Replacement Guide
Replacing a radiator overflow tank is a manageable DIY project that can save you money on labor costs. Follow this comprehensive step-by-step guide for a successful replacement.
New overflow tank
Hose clamps
Cooling system hose
Drain pan
Funnel
Fresh coolant
Socket wrench/pliers
Safety gloves
-
Preparation
- Park on level ground and ensure engine is completely cool
- Disconnect the vehicle's battery for safety
- Organize all necessary tools and materials within reach
- Wear protective gloves to prevent coolant contact with skin
-
Remove the Old Overflow Tank
- Position a drain pan under the overflow tank to catch coolant
- Carefully loosen and remove hose clamps using pliers or socket wrench
- Disconnect all hoses from the old overflow tank
- Remove mounting bolts or clips securing the tank to the vehicle
- Carefully lift out the old tank, being mindful of any remaining coolant
-
Install the New Overflow Tank
- Compare new tank with old one to confirm proper fit and port locations
- Position the new radiator overflow tank in the mounting location
- Secure with mounting bolts or clips, tightening to manufacturer specifications
- Connect all hoses to appropriate ports on the new tank
- Secure hoses with new hose clamps for best results
-
Refill the Cooling System
- Use a funnel to carefully add the recommended coolant to the new overflow tank
- Fill to the appropriate level between minimum and maximum markings
- Use the correct coolant type as specified in your vehicle's manual
- Ensure proper mixture ratio of coolant to distilled water (if applicable)
-
Final Checks
- Reconnect the vehicle's battery
- Start the engine and allow it to warm up to operating temperature
- Check for any leaks around hose connections and the tank itself
- Verify that coolant level remains stable during operation
- Turn off engine and recheck coolant level once cooled
Safety Warning: Coolant is highly toxic to humans and pets. Clean up any spills immediately and dispose of used coolant according to local regulations. Never pour coolant down household drains or onto the ground.
DIY Tip: After replacement, drive the vehicle normally for a few days, then recheck all connections and coolant level. Air pockets can sometimes form in the cooling system that may require additional coolant after initial use.
Frequently Asked Questions
What are the signs of a damaged radiator overflow tank?
A damaged radiator overflow tank will typically exhibit several recognizable symptoms:
- Visible leaks - Coolant puddles under the vehicle where the tank is located
- Low coolant level - Consistent need to add coolant despite no visible external leaks
- Engine overheating - Temperature gauge reading higher than normal during operation
- Physical damage - Visible cracks, discoloration, or deformation of the tank
- Sweet smell - Distinctive coolant odor in or around the vehicle
- Brittle tank material - Tank feels fragile or shows signs of deterioration
Can I drive with a damaged radiator overflow tank?
No, it is not recommended to drive with a damaged radiator overflow tank. The overflow tank is an essential component of your vehicle's cooling system. A damaged tank compromises the entire cooling system functionality, which can lead to:
- Engine overheating and potential severe engine damage
- Coolant loss, increasing the risk of overheating
- Possible engine seizure in extreme cases
- Expensive repairs that far exceed the cost of replacing the tank
If you suspect your overflow tank is damaged, have it replaced immediately to avoid costly engine repairs.
Can a damaged radiator overflow tank be repaired?
There is no reliable or recommended method for repairing a damaged radiator overflow tank. Attempting repairs is generally discouraged for several reasons:
- Handling coolant can be dangerous as it can cause chemical burns
- Repaired tanks often develop leaks due to pressure and temperature fluctuations
- A cracked tank may allow air into the cooling system, preventing proper coolant circulation
- DIY repair materials typically cannot withstand the heat and pressure of a cooling system
The safest and most reliable solution is to replace the damaged overflow tank with a new one that meets your vehicle's specifications.
Can I install a radiator overflow tank without professional help?
Yes, replacing a radiator overflow tank is a DIY-friendly project for those with basic mechanical skills. The process involves:
- Simple tools that most home mechanics already own
- Straightforward removal and installation procedures
- No specialized knowledge beyond basic vehicle maintenance understanding
- Minimal risk when proper safety precautions are followed
However, if you're uncertain about any step in the process or encounter complications, seeking professional assistance is advisable to avoid potential cooling system damage.
Which is the best material for a radiator overflow tank?
High-density polyethylene plastic is generally considered the best material for radiator overflow tanks due to its:
- Durability - Resists cracking even after years of heat exposure
- Corrosion resistance - Doesn't react with coolant chemicals
- Temperature stability - Maintains structural integrity through heating/cooling cycles
- Lightweight properties - Adds minimal weight to the vehicle
- Cost-effectiveness - More affordable than metal alternatives
For classic car restorations, metal tanks (typically aluminum) may be preferred for period-correct appearance, though they generally cost more and may be more prone to internal corrosion over time.


 浙公网安备 33010002000092号
 浙B2-20120091-4