Popular in your industry


Top categories


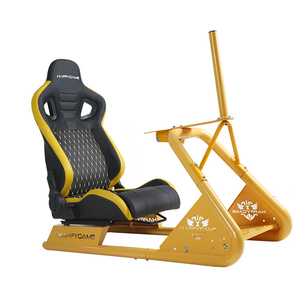
About diy racing sim rig
Introduction
Welcome to the thrilling world of sim racing! This article will guide you through the exciting journey of building your own DIY racing sim rig. From understanding the nuances of sim racing setups to choosing the right components, we'll cover everything you need to know. We'll delve into the planning, budgeting, and design aspects, and walk you through the assembly process. Whether you're a beginner or an advanced racer, this guide will help you create a custom rig that matches your needs and preferences, providing an immersive and realistic racing experience right in the comfort of your home.
Understanding Racing Sim Rigs
Sim racing is a branch of the simulator genre of games that simulates real racing cars in the virtual world. These sim racing setups aim to provide the user with the most realistic simulation and the sense of being on an actual racetrack in a real racecar. This means that sim racing setups emphasize factors that play a part in the way a car handles, compared to what is known as ‘arcade racers’. Sim racing is simulations that attempt to bring traditional racing to your sim racing setup at home. Of course, there are differences between sim racing setups. A beginner sim racing setup doesn’t require the same hardware as an advanced sim racing setup.
Why Build Your Own Racing Sim Rig
Building your own DIY sim racing rig is a cost-effective and satisfying alternative to buying a new one. A DIY rig allows for customization and flexibility, enabling you to add various accessories and adjust components to your preference. It's a future-proof investment that grows with your experience and budget. However, it's important to note that building a sim rig requires time and effort, and the total costs can be high due to the flexibility of the setup.
Types of Racing Sim Rigs
Sim racing rigs come in various types, each offering a unique racing experience. The choice of rig can be influenced by factors such as budget, space, and personal preference. For instance, you can opt for a budget-friendly CSL DD wheelbase or a more powerful but expensive wheelbase like the Fanatec Podium DD2 or SimuCube. The ultimate direct drive experience requires a strong wheelbase. Additionally, your rig setup can include a racing wheel, pedals, and a sim rig. Remember, there isn't a single best route for this build, it's all about personal preference and what suits your needs.
Planning Your DIY Racing Sim Rig
Planning your DIY racing sim rig involves understanding the components and their purpose. Your rig consists of a cockpit or rig, seat, monitor stands, wheel decks or wheel mounts, and pedal bases. The cockpit is the chassis to which most of your equipment is mounted. Seats add authenticity to your setup, while monitor stands can be standalone or an accessory to your rig. Wheel decks or mounts are usually supplied with the rig, and pedals can be mounted onto the profile or a pedal base plate. The wheelbase translates the simulated forces in the simulator software to Force Feedback (FFB).
Budgeting for Your Project
Building a DIY racing sim rig requires careful budgeting. The cost can range from a few hundred to several thousand dollars, depending on the components you choose. For a high-end setup with a powerful direct drive racing wheel and a sturdy sim rig, you might need to invest over $1000. However, if you're on a tight budget, you can still get a complete setup with a sim racing cockpit, a racing wheel, and a pedal set for a few hundred dollars. Remember, the overall price depends on the sim racing gear you select.
Choosing the Right Components
When choosing the right components for your DIY racing sim rig, consider products from Sim Race Components. They design and manufacture each component in Italy, collaborating with selected suppliers to ensure every construction detail is taken care of. This guarantees a quality product and efficient, flexible service. Some of their offerings include the SRC Monza, SRC Milano, SRC-1 Plus Upgrade Kit, SRC Sport, and SRC FX. These components are the result of technology and passion, ensuring you get the best for your racing sim rig.
Designing Your Rig for Comfort and Performance
Designing your DIY racing sim rig for comfort and performance involves optimizing ergonomics. Start with a stable base for your seat and adjust its height, distance, and angle for optimal visibility and comfort. Lumbar support and seat padding can enhance comfort during long racing sessions. Adjust the height and distance of your wheel for a natural grip, and position your pedals for a comfortable foot position. Ensure proper ambient lighting to avoid eye strain and position your monitor at eye level at a comfortable distance. Remember, customization is key to find the most optimal and enjoyable racing position.
Building Your Racing Sim Rig
Building your own racing sim rig can be a rewarding project. You can use a variety of materials, such as 1" x 2" aluminum tubing or 2x4s. Some have even built their rigs out of MDF and a couple of 2x4's. The design should put you in a driving position similar to a real car. For instance, one user mounted his Thrustmaster T3PA pedals inverted for a more realistic driving experience. You can also modify the throttle pedal to hang a bit lower for a more natural position. Remember, the rig should be sturdy enough to handle your wheel and other controls.
Assembling the Frame
Assembling the frame of your DIY Racing Sim Rig is a crucial step. Neff Power's kits, made with T-slotted aluminum from 80/20, Inc., offer complete customization. You can adjust your seat mount position, pedal position, monitor mount, and steering frame. The wider footprint prevents tipping and allows for a level frame. Remember, accessories and tools are sold separately. Call (855) 727-6200 for more information.
Installing the Seat and Controls
When installing the seat and controls on your DIY racing sim rig, it's crucial to consider comfort and adjustability. The seat, ideally a car seat, should be adjustable and comfortable for long hours of use. It's easier to use an adjustable car seat than to make the frame adjustable both horizontally and vertically. The seat is mounted using M8 screws. For the controls, the steering wheel's frame can only move vertically, so adjustments must be made for both the pedals and the seat. The pedal carriage should be adjustable and assembled before most of the parts. The steering wheel is another adjustable part, and it should be kept as square as possible for maximum comfort and efficiency.
Setting Up the Display and Audio System
When setting up your DIY racing sim rig, the audio system plays a crucial role in enhancing the immersive experience. Consider investing in speakers that offer a level of immersion that headphones can't match. Stereo speakers are a cost-effective option, providing a rich, full sound. For a more immersive experience, consider a 5.1 surround sound setup, which offers accurate directional audio. Soundbars are a compact solution, ideal for those with limited space. For those seeking the best audio experience, consider high-end options like a receiver and speaker system.
Testing and Adjusting Your Rig
When building your DIY racing sim rig, it's crucial to test and adjust your rig for optimal performance. This includes calibrating your sim racing pedals, which have evolved from basic structures to sophisticated devices made of alloys, with load cells, pistons, and hydraulic dampers. Companies develop software to maximize the configuration and performance of these pedals. Examples include Heusinkveld's SmartControl, SRP's MySetup application, DCSimracing utility, and BJSimracing's calibration software. These tools allow you to modify and seek advantages in pedal behavior, ensuring a realistic racing experience.
Initial Testing and Calibration
Calibrating your DIY racing sim rig is crucial for optimal performance. Pedals, for instance, have evolved from basic structures to sophisticated creations made of alloys, equipped with load cells, pistons, and hydraulic dampers. Companies develop software to maximize the configuration and performance of these pedals. Examples include Heusinkveld's SmartControl, SRP's MySetup, and DCSimracing's utility. These programs allow you to adjust the potential of your pedals to your preference, ensuring a realistic racing experience.
Making Necessary Adjustments
Making necessary adjustments to your DIY racing sim rig is crucial for comfort and performance. Start by adjusting the wheel distance and tilt to suit your preference. Then, set up the preferred height of your wheel. Next, adjust the angle and distance of the pedals. Remember, every person is unique, so there's no 'correct' setup. It's all about what feels right for you. This process might require some trial and error, but it's worth it for the enhanced racing experience.
Conclusion
Building your own DIY racing sim rig is a rewarding endeavor that brings the thrill of the racetrack to your home. It's a journey that requires careful planning, budgeting, and a keen understanding of the components involved. But the result is a custom, future-proof setup that grows with your experience and budget. Remember, the key to a successful build lies in personalization and comfort. With the right tools and guidance, you can create a rig that not only enhances your sim racing experience but also reflects your passion for the sport. So, buckle up and get ready to unleash your inner racer!